Logframer overview and lay-out options
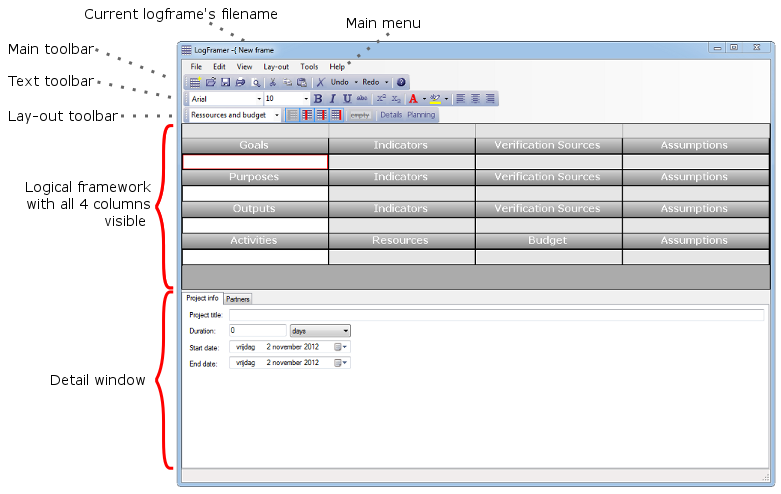
The Logframer interface has three main parts. On top you’ll find the main menu and the toolbars.
The logical framework itself sits in the middle, in the picture below with all four columns visible. You can modify the lay-out of the framework using the buttons of the lay-out toolbar.
Finally, on the bottom you can see the detail window. If this window is not visible, you can press the  button on the lay-out toolbar to show or hide it.
Changing the lay-out of the logical framework
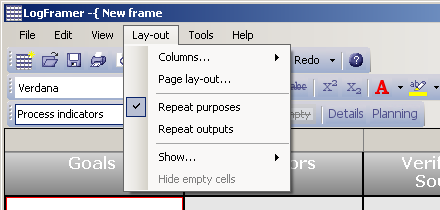
Use the lay-out toolbar to modify the appearance of the logical framework. Alternatively, you can use the options that you find under the Lay-out option of the Main menu on top.

View the Resources and Budget or the Process indicators and Verification Sources in the Activities section (bottom section)
The Resources and Budget combo box allows you modify the bottom row of the logframe (the Activities section). You can choose between:
- Displaying the Resources in the second column and the Budget in the third column
- Displaying the Process Indicators to follow up the activities in the second column, and their Verification Sources in the third column.
Note that you can fill out all this information, and use the combo box to switch between one view and another. No information is lost when you change this view.
As an alternative to using the combo box on the Lay-out toolbar, you can also use the Main menu and click on Lay-out > Show… > Process Indicators (or Resources and Budget).

Show and hide columns (and create custom print/export views)
Use these buttons to show or hide the columns of the logframe:  . Logframer will distribute visible columns evenly over the available space. This makes it easier for you to concentrate on the column(s) you’re working on. But it also allows you to make custom prints of your logframe. For instance, if you just want to print your project’s objectives and its assumptions and risks, you can hide the second and third column and then print the logframe. You can also export this custom view to Microsoft Excel™ or Microsoft Word™.
When you show/hide columns:
- The Project Logic column (first column) remains visible at all times, so you can’t hide it.
- When you hide the Indicators column (second column), the Verification Sources column (third column) will also be hidden.
- When both the Verification Sources column and the Indicators column are hidden, and you press the Show Verification Sources button, both the second and third column will be shown.
Instead of using these buttons, you can also modify the column lay-out by using the Lay-out option of the Main menu (Lay-out → Columns → name of the column you want to show/hide).

A new logframe document with the Indicators and the Verification Sources column hidden. The Details window at the bottom is hidden too.
Hide empty cells
To get a more compact overview of your logical framework, you can hide the empty cells that are used to add objectives, indicators, verification sources, assumptions and so on. Just click the Hide empty cells button: ![]()
Note that this button is not enabled when the logical framework is empty.
When you print (or print preview) your logical framework, Logframer will automatically hide the empty cells to save space.
Repeat Purposes or Outputs
When you have a logical framework with more than one output (as you will generally have), Logframer repeats the outputs in the Activities section. Similarly, if you have a very large logframe with more than one purpose, Logframer will repeat the purposes both in the Outputs and the Activities section. This makes it easier to see what activities belong to which output or purpose. Note that the purpose or output is only displayed in the sections below it if you have more than one.
Should you want to hide these repeated outputs or purposes, then you can deselect this option using the Main menu. Drop down the Lay-out option and deselect the Repeat purposes or the Repeat outputs option.
Faster or more accurate text rendering
Note: the following feature is only available in version 1.2 (or later) of Logframer
If you have a large logical framework, you may notice that it takes more time for the application to show the text on your screen. You can choose to present (or 'render') the text faster on your screen, but this means that the quality of the text will diminish somewhat. If you choose accurate rendering instead, it will take a bit more time to refresh the whole logframe, for instance when you change the width of a column.
To switch between fast and accurate rendering, go to the Main menu and select Lay-out → Rendering... and then choose Fast or Accurate rendering.
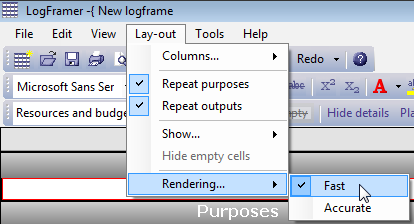
Notice that the more different fonts and text options (such as bold, italics, different colours...) you use, the slower the text will render on your screen.
The Details window
The Details window can be found at the bottom of the screen. If it is not visible, press the  button on the lay-out toolbar to show it.
The Details window changes according to what section and what column is selected in the logframe. For instance, when you click on one of the goals, you get the following window which allows you to complete information about your project in general:
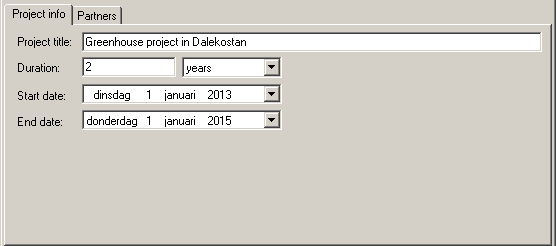
The Details window allows you to include all kinds of information related to your project in a single place/file. This way, you can create additional documents such as the project’s plan with its key moments and activities plan, or the Performance Measurement Framework or the Risk Register in addition to your basic Logframe.
Whether you want to complete all this information using the Details window is however entirely up to you.
The Planning window
To open the Planning window, press the  button on the lay-out toolbar. Alternatively, you can select View → Planning in the Menu bar.
The Planning window only gives you an overview of the activities and key moments you've identified. It doesn’t allow you to modify anything. Once you've identified the activities in the logframe window, you need to indicate the starting date and the duration of the activities in the Details window. Similarly, once you've formulated one or more outputs, you can add the key moments.
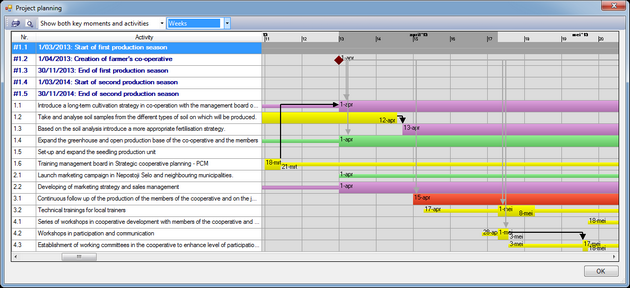
In the picture above, you can see that:
- The key moments are listed on top in blue and their numbers begin with '#'. In the planning overview on the right, you can see the key moments as red diamonds.
- The activities are listed under the key moments in black. The activities themselves are displayed as thick bars, while the preparation and follow-up periods are displayed as thin bars before and after the activities.
- Black arrows show where one activity follows (or precedes) the other. Grey arrows show where an activity follows a key moment.
The activities are colour coded:
|
Activity |
Colour code |
|
Identification, selection, registration |
Orange |
|
Hiring, procurement, logistics |
Light blue |
|
Activities (general), construction, distribution, medical treatment, humanitarian assistance, peace building |
Light green |
|
Research, training, capacity development, awareness raising |
Yellow |
|
Meetings, Travel |
Blue |
|
Evaluations, audits, monitoring |
Red |
|
Other types |
Dark green |
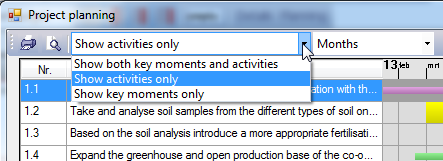
Changing the view of the Planning window
You can use the drop-down menu to select one of three viewing options:
- Show both key moments and activities
- Show activities only
- Show key moments only
This example shows the activities without the key moments.
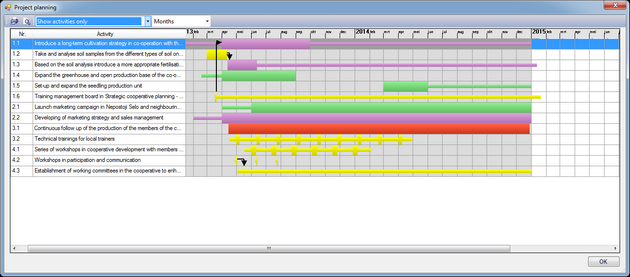
Change the timeframe of the Planning window
You can change the level of detail you see in the planning window by means of the second drop-down menu. If you want an overview of the whole project, select 'Years' or 'Months'. When you select 'Months', you will get more information about the activities, in the form of their starting and ending dates. If you select 'Days' you will also see who is doing the activity and where it takes place (provided you filled out all this information in the Activity details window of course).
