Importing an existing Logical framework from a MS Word document
Note: the following feature is only available in version 1.3 or higher
To import an existing logframe from a Microsoft Excel spreadsheet, go to File → Import → Logframe from MS Word document.
Note: before importing an Word document, it's best to make sure that the document is not opened in Word because this may slow down the importing process considerably.
You can only import a logical framework if you made it in a table. Furthermore, this table must not contain any vertically merged cells. If the table does contain vertically merged cells, the importation process will break off.
The import process consists of four steps:
- Select the MS Word document that contains your logical framework
- Select the table that contains your logframe
- Indicate which columns contain the objectives, indicators, verification sources and assumptions
- Indicate the rows that contain the goals, purposes, outputs and activities
After you've completed a step, click on the Next step button to proceed. When you've filled out all the information, you can press the <Import> button on the bottom.
Once you've imported the logical framework, you'll have to shuffle things around a bit. Because Logframer doesn't know which activity belongs to which output and which output belongs to which purpose, they are all placed under the first output or purpose respectively. However, it's easy to move them to their correct location.
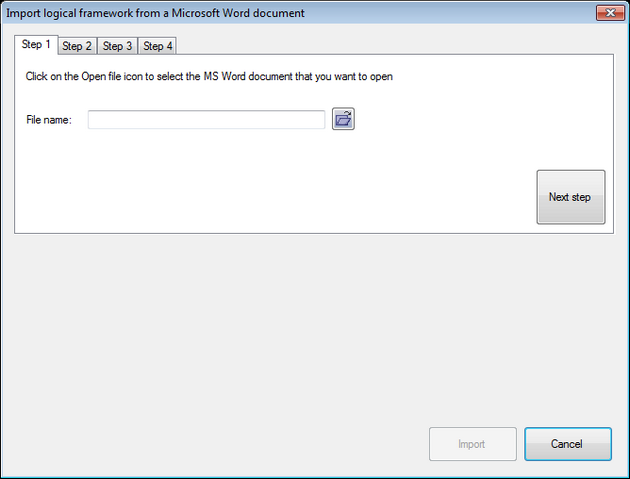
Selecting the Word document
The first step is to select the file that you want to import. Press on the button to open the File selection dialog. Navigate to the file you want to import, select it and then click Ok.
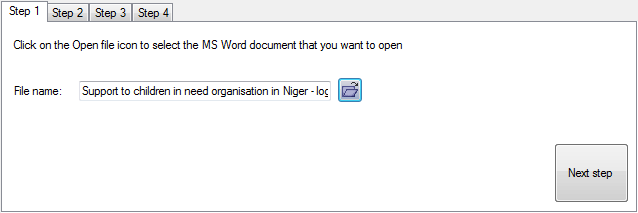
Once you've selected the file, you will see a preview of the first table in the bottom half of the window.
Before loading the first table, Logframer will verify that the table does not contain any cells that are vertically merged (two or more cells located on top of each other that were merged). If the table does contain such cells, you will get the following warning:

In this case, open the document in Word and split up any merged cells in the table. Then try importing again.
Press the Next step button to proceed.
Select the table that contains your logframe
If the document contains multiple tables and the one that is shown on the bottom does not contain your logframe, you can use the drop-down list to select the correct table.
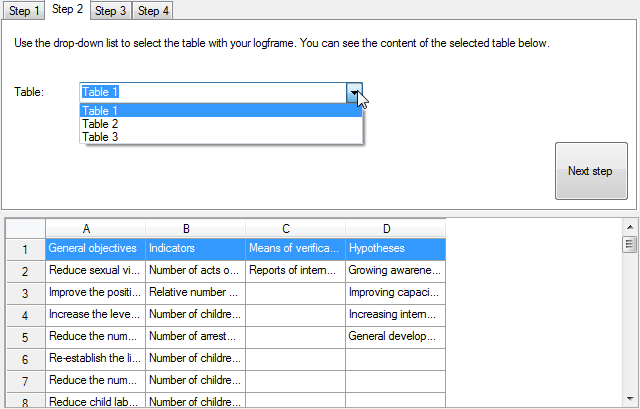
Press the Next step button to proceed.
Choosing the columns of your logframe
Next you need to indicate in which columns the objectives, indicators, verification sources and assumptions can be found. You only need to select the columns that contain the actual text. If you've numbered each item in a separate column in your Word document, you needn't worry about the numbering. Logframer will renumber all the items.
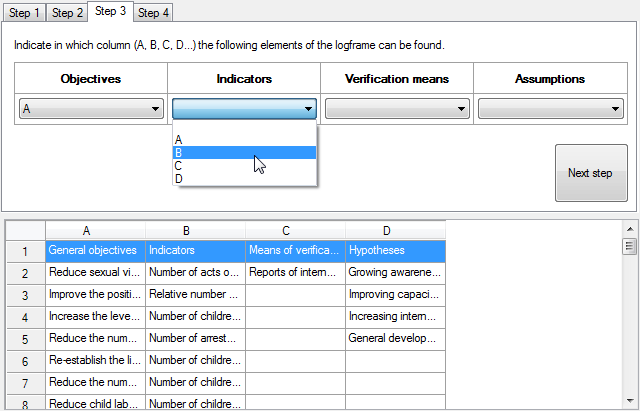
Press the Next step button to proceed
Indicate the different sections
Finally, you have to indicate for each section in which rows the objectives, indicators, etc. can be found. This means that for each section, you enter the number of the first and the last row. Do not include any title rows (if you do, these will also be imported and then you have to remove them manually because Logframer uses its own section titles).
For instance, in the example below, the first row is a title row. So the goals section starts on the second row. The goals section also ends on the tenth row. Row eleven again is a title row, and the purposes section starts on row twelve.
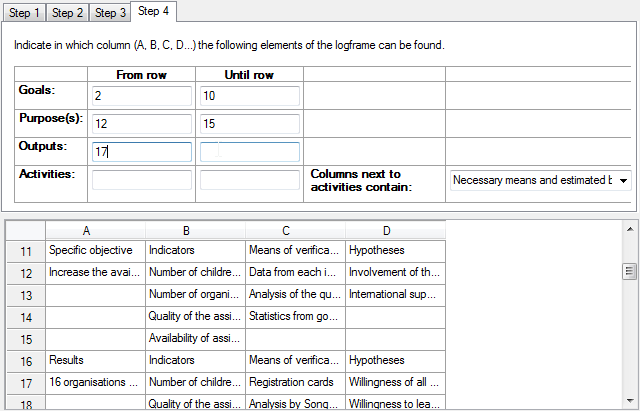
You can also select what information can be found in the second and third column of the Activities section. In most cases, this is where you'd put the necessary resources and the budget for each resource. But if you use progress indicators to check how your activities are doing, you can do that too.
You don't need to import a whole logframe. If you only want to import goals and purposes for instance, but not the outputs or activities, you just complete the start and end rows for the first two sections.