Planning an activity
When you click on an activity, you can view or complete any related planning information.
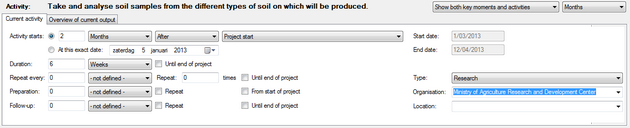
Setting the starting date and the duration of an activity
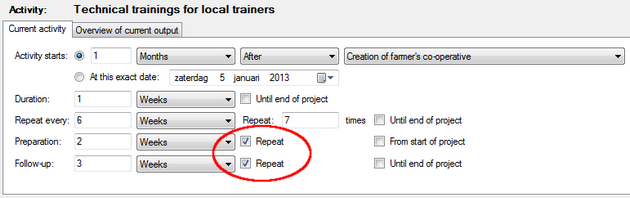
First you have to determine the starting date of the activity. As with key moments, you have the choice between a date relative to another activity or key moment, or an exact date. The advantage of a relative date is that you can make clear that the first activity has to end before the second one can start (because you need the results of the first activity as an input for the second one). For instance, you want to cultivate new crops. But before you can start planting, you need to analyse the composition of the soil, to make sure your new crops will grow in that particular kind of soil. So the planting can't start before you have the results of the soil analysis. If the analysis takes longer, the planting moves forward in time too. You can achieve this by using relative dates:
- Insert the number of days/weeks/months in the first field.
- Select the time unit. You can choose between minutes, hours, days, weeks, months, trimesters, semesters or years.
- Select whether this activity will start before or after the other activity.
- Select the activity or key moment to which you want to make a reference. You can choose from any key moment or activity that you've defined, as well as the project's start or ending.
Alternatively, you can select any specific date using the date selector on the second line.
Next, you can determine the duration of your activity, in minutes, hours, days, weeks, months, trimesters, semesters or years. If you want the activity to continue until the end of your project, first select the duration unit, and then check the Until end of project box. Logframer will then calculate the number of days/weeks/months... until the end of the project.
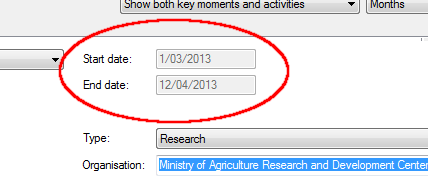
Once you've set the starting date and the duration of your activity, you can verify the exact starting and finishing date of your activity to the right.
Repeating an activity
You can repeat an activity any number of times. First, set the interval at which you want to repeat the activity. In the example below, we'll repeat the activity every six weeks.
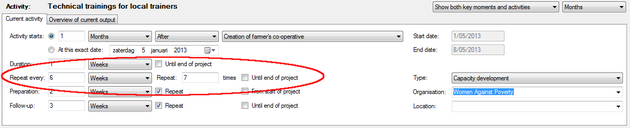
Next, you can determine how many times you want to repeat the activity. If you set the Repeat value to 1, the activity will show up two times in your planning: the original activity and then the one repeat. When you set this value to zero again, the activity will not be repeated.
When you check the Repeat until end of project box, Logframer will calculate the number of times you're activity will be repeated until the end of the project.
Setting the preparation time and the follow-up period
You can indicate how much time you will need to prepare for your activity using the Preparation field. Below, you can determine how much time you want to dedicate to follow-up your activity.
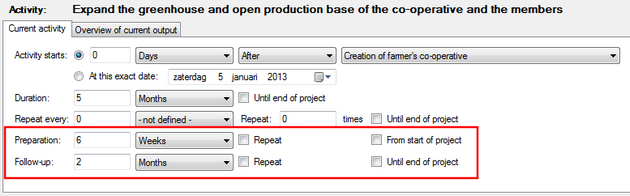
If you have a repetitive activity, the Repeat check boxes allow you to choose whether you'll only need the preparation or follow-up time for your original activity, or every time you're repeating it.
For instance, if you want to do a series of presentations, you may have to prepare a document or Powerpoint presentation once, before the first presentation. The next time, you won't need any time to prepare. However, if you're in charge of the logistics of a series of workshops, you may need a day of preparation time before every workshop, to set up the sound system, arrange the chairs, clean the room, etc. In such a case, you may want to use the Repeat option.
Using the From start of project option, you can indicate that the preparation time will run from the start of your project until the beginning of your activity. Logframer will calculate the number of days/weeks/months... you have until then.
Similarly, you can extend the length of your follow-up period until the end of the project by checking the box to the right.

Other information about the activity
Selecting the type of activity
Using the Type field at the right, you can indicate what kind of activity you're dealing with. You can select from a large number of options, including: Planning, Reporting, Monitoring, Registration of beneficiaries, Procurement, Meetings, Travel, Construction, Research, Distribution, Humanitarian Assistance, Capacity Development, Raising awareness, etc.
Who is responsible for the activity?
The Organisation field allows you to select which partner organisation or contractor will be responsible for the execution of the activity. You can select any organisation from your Partners list.
Where will the activity take place?
Use the Location box to indicate where the activity will take place. You can insert any new place, or select a place where you've previously organised an activity from the drop-down list.
Getting an overview of the activities of the current output
When you have a number of activities, some of which are linked to others and some of which may need preparation time, or follow-up afterwards, or may have to be repeated, it can become difficult to keep track.
When you click on the Overview of current output tab, you will get an overview of all the activities of the current output in the form of a Gantt-chart.
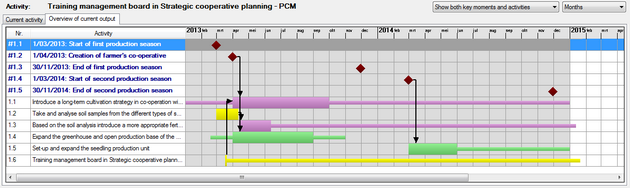
The two drop-down lists at the top right allow you to manipulate the view of this Gantt chart.
- You can choose to see the activities only, or both the activities and the key moments that you have identified for this output.
- You can change the level of detail to days, weeks, months or years.
On the left, you can see the list of key moments (shown first in blue) and activities. On the right, you can see the actual Gantt chart:
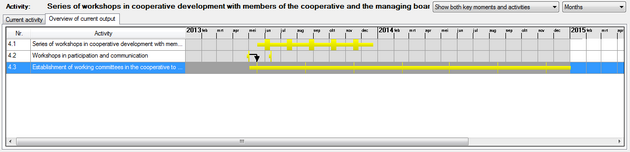
- The duration of each activity is shown as a horizontal bar. The activity itself takes up the whole height of the row (thick part). The preparation time and the follow-up period are shown as thinner lines before and after the activity itself.
- Each type of activity has another colour (here purple is related to planning, green is construction, yellow has to do with capacity development)
- The black arrows show which activities are linked to key moments (the red diamonds), or to other activities.
Alternatively, if you want to have an overview of the activities and/or key moments of all the outputs - or in other words the complete planning of your project - you can open the Planning window.